
Do you remember the last time you shopped online? Once ordered, nearly all online stores allow you to track the location of the pending parcel. Package tracking gives you real-time updates of the packages current location and the stops it made along the way. This service roughly illustrates what the Traceroute command does in computer networking. This article will discuss the implementation of the traceroute command, specifically in Linux environments.
Traceroute: How it Works
Traceroute command is a useful addition to your set of network diagnostic tools. The traceroute command, put simply, is a command for computer associated networks that shows the route as well as measuring transit delays of packets in an Internet Protocol network. Packets (more formally Network Packets) can be thought of as formatted units of data that you send from your computer and that travel along the network. When you shop in an online store, the store notifies you of every port, airport and post office your package goes through with accurate timestamps during the delivery. Similarly, the traceroute command records the times received for each round-trip of the packets’ successive hosts in the route, returning times per each “hop”.
More technically, traceroute uses a field known as the time to live (ttl) field. It is part of the IP Protocol and it is used to try and get an ICMP response from each node on the path to the destination node called a “Time Exceeded” response. Traceroute sends packets with time to live and gauges for this response from the gateway. When the command receives a different ICMP response, “Port Unreachable”, the target host has been reached. A must have parameter for traceroute to work is the hostname or an IP address. However, The use of parameters known as switches allow for more specific information and more focused troubleshooting.
Traceroute: A Good Troubleshooting Tool
You will find the traceroute command extremely useful in troubleshooting network problems. Since the packets you send (when you google something for example) have to go through various stations (local routers, ISP routers, backbone networks, etc.) before reaching the actual page you requested. The traceroute command can help you to visualize the exact route taken between your computer and a website’s servers. It can also show you parts of the path with the highest traffic (longer response times) and where a network connection fails if there is an issue. While troubleshooting, this can sometimes be the difference in knowing whether a router is malfunctioning or if connectivity problems are on due to failures of the web server or other remote host.
Using Traceroute in Linux
Traceroute is a command line tool which is available in the Linux terminal. The syntax is as follows:
traceroute [option parameter] host_address [length of path]
When running traceroute on a website, (with google.com being cited as an example), one could get the following output:
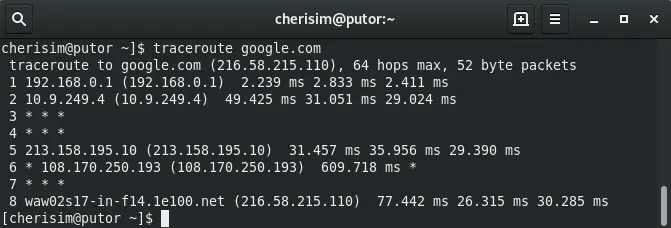
Understanding the Traceroute Output
Interpreting the output column by column, we have the first column (in bold) which represents the number of hops.
8 waw02s17-in-f14.1e100.net (216.58.215.110) 77.442 ms 26.315 ms 30.285 ms
The second column shows the address of the hop. This can be the hostname if resolvable by DNS, and/or the IP address of the node.
8 waw02s17-in-f14.1e100.net (216.58.215.110) 77.442 ms 26.315 ms 30.285 ms
The third column shows 3 times given in milliseconds. This is because the traceroute command sends three packets to each address or hop and reports back the times taken by each packet. The number of packets to be sent can be changed as will be shown later.
8 waw02s17-in-f14.1e100.net (216.58.215.110) 77.442 ms 26.315 ms 30.285 ms
In our example above, hops 3, 4 and 7 may either have failed to send a response entirely or generated one that was too small to reach us. If the default timeout of 5 seconds expires without an answer, traceroute prints three asterisks (* * *) to the standard output (STDOUT). One asterisk for each packet sent, remember three packets are sent to each host.
3 * * *
In the case of a router (or hop) being unreachable or un-resolvable, one could expect output similar to this:
cherisim@putor ~]$ traceroute google.com
 traceroute: unknown host google.com
or
cherisim@putor ~]$ traceroute google.com
 traceroute: request timed out
Traceroute Options
As highlighted above, one parameter is obligatory for Traceroute to work. This is either the hostname or its IP address. Although there may be some instances where the user wants the route tracing to happen in ways other than the default. There are options that can achieve more specific results. As a reminder, the syntax follows the pattern:
traceroute [option parameter] host_address [length of path]
Below you will find some useful options and their uses. Of course, the list of options given below is not exhaustive, but rather is an outline of the most used options.
Force Use of IPv4
Tells traceroute to use IPv4 addressing.
cherisim@putor ~]$ traceroute -4 google.com
Force Use of IPv6
Force traceroute to use IPv6 addressing.
cherisim@putor ~]$ traceroute -6 google.com
Specify Number of Packets Per Hop
Specifies the number of packets sent per each hop. The default is three.
cherisim@putor ~]$ traceroute -q [number of queries] google.com
Specify First_TTL / First Hop
Specifies which ttl the trace should start from. By default traceroute uses one.
cherisim@putor ~]$ traceroute -f [first_ttl] google.com
Specify Max_TTL / Maximum Hops
Sets the maximum number of hops in which the packet should reach the destination. The default value is set to 30
cherisim@putor ~]$ traceroute -m [max_ttl] google.com
Specify Gateway to Use
Specifies the gate through which traceroute will route he packet
cherisim@putor ~]$ traceroute -g [IP address] google.com
Specify Port to Use
Specifies the port to be used in the trace. The default value is set to 33434
Get More Help from the Command Line
As with most Linux commands, you can always get more help by using the following option.
cherisim@putor ~]$ traceroute --help
Conclusion
Troubleshooting network issues on your Linux system may seem complicated. With the right tools we can easily spot the culprits in a malfunctioning network. Using traceroute we can discover roadblocks on the route to a target host address. We can also map the path taken by data bits we send from our machine.
In this article we covered the basics of the traceroute command. We discussed how traceroute works, explained the output, and showed some basic options. You should now be comfortable using traceroute to find network issues on your own system.
Thanks for the explanation of the traceroute output. thank makes it more clear for me.