
When you ring a doorbell, you usually expect one of two things: a response if somebody is at home, or no response when nobody is available to answer the door. Think of this as a real-life equivalent of the computer networking command, ping. In this article, we will consider the ping command as the computing “knock” at the door of every host on an IP (Internet Protocol) network.
What is Ping?
Ping is a software utility that is used in the administration of computer networks. It tests whether a host (a network connected device) is reachable or not. Already, one can imagine what this implies; if there is a computer, a mobile device, a printer or some router connected to a network, a user can check whether it is online and reachable simply by using the ping command. This can be extremely useful in troubleshooting. For example, a printer that continuously gives no response may accidentally have been turned off entirely, be misconfigured, or have faulty cabling.
The origins of the naming convention also give insight into how the utility works. Sonar technology, from which the name derives, emits a pulse and waits for the return echo to detect submerged objects. In essence, submarines or ships “ping” the sea to check if there are objects there.
How Does Ping Work?
The ping command sends ICMP echo requests in packets to a target host and waits for a reply. The response to an echo request is referred to as the echo reply. In reporting back to the source of the echo, ping tells of errors if any, whether packets were lost and the time taken for the messages to be returned. We will illustrate the Linux implementation of ping below. Referring back to our doorbell illustration, pinging represents our ringing the doorbell with the echo requests being the actual sound the doorbell makes. If the host is available or “at home”, we get a response and can gauge their response time. If the host is unavailable or “not at home”, then we will receive no answer and the ping utility will report it to us.
How to Use Ping in the Linux Environment
The syntax for the ping command, with google as an example of a target page, is as follows:
ping [option] target
It’s possible to ping either a hostname or an IP address. In either case, you can expect results similar to the following:
For a hostname:

NOTE: In order to use a hostname, you must have DNS configured or some other mechanism for resolving the hostname to an IP address.
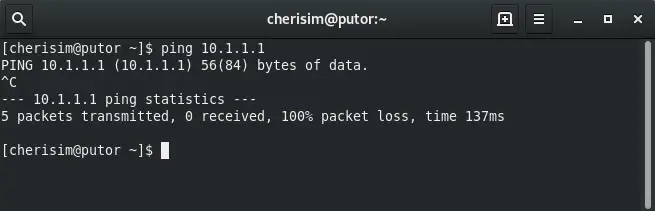
For an IP address:

In the case of a host being unavailable, the Linux terminal would give feedback that the request timed out. This will be obvious because you will see 100% packet loss.
Without applying any options, the system would keep on sending packets and the operation would continue running until sent an interrupt . To stop pinging in such cases, we should hit ctrl+c (SIGINT). After the ping command has stopped running, the terminal displays statistics for the target host. These may look something like this:
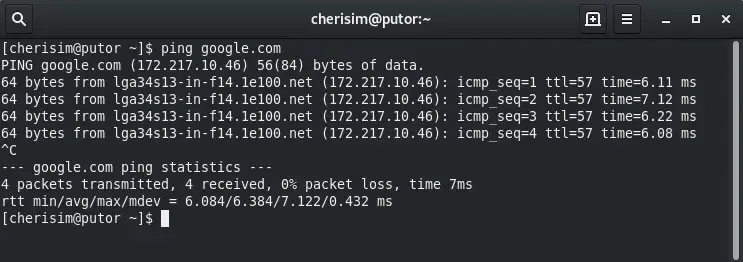
The 0% packet loss tells us that there were no packets lost and that google is in good working condition.
Ping Output Explained
Let’s take a look at the reply lines and break it down.
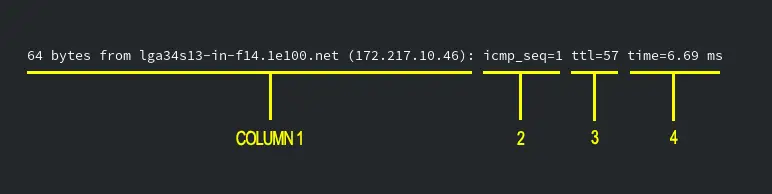
Above, the first column shows the number of bytes and the address that sent them back.
The second, is a count of ICMP requests that have been sent thus far.
The third column shows the default TTL (Time to Live) of the target host. The TTL is basically a timer that tells networked devices how long to use the packet before it expires (more information in the resources section below).
The fourth column is the round trip time: the time between the echo request being sent and the echo reply being returned.
When the command completes it prints statistics of that run to standard output (STDOUT). It should look similar to this:

These columns are more self explanatory. It shows the number of packets sent, number of packets received (returned), the percentage of packet loss if any, and the total time that the command ran.
The next line shows RTT (Round Trip Time) in several formats. The minimum, average, maximum and mdev (deviation – an average of each RTT is from the mean RTT).
Using Options with the Ping Command
Should it occur that a user wants the ping operation to run slightly more specifically than the default, adding a few options to the command would do the trick. Below are a few common options that a user may include to change the commands functionality.
Select the number of packets
Define the number of pings sent before the command exits.
[cherisim@putor ~]$ ping -c [number] target
Choose size the packets
Specify the number of data bytes to send. Default is 56.
[cherisim@putor ~]$ ping -s [size] target
Specify a deadline, in seconds
Le’ts the user decide how long, in seconds, the comand will execute.
[cherisim@putor ~]$ ping -w [seconds] target
Quiet output – Show only Summary
Hide all of the sequential requests and only show statistics.
[cherisim@putor ~]$ ping -q target
This list is by no means exhaustive. Linux libraries are laden with further useful options that make the ping command more versatile and specific to your troubleshooting needs. For more information see the Ping manual pages linked in the resources section.
Conclusion
Using the ping command is fairly easy. We hope this article adds to your understanding of network tools and makes troubleshooting in Linux that much easier. If you feel comfortable with this command, it may be time to learn traceroute or other network tools.