
In this article we will discuss the Linux DNF (or YUM) history command. This command allows you view a timeline of DNF transactions. This high view of package manager transactions makes it easy to correct issues with your Linux system updates and see exactly what has happened.
This comes in handy because updating a Linux system with the newest packages does not always go as planned. Something you have minor issues like applications failing, and other times you have serious issues like a kernel panic that stops your system from booting.
Let’s take a look at how to use the DNF / YUM history command and how it can help us manipulate transactions.
Table of Contents
DNF vs YUM
DNF (Dandified YUM) is the new and improved version of YUM (Yellowdog Updater Modified). Yum was replaced by DNF in Fedora version 22 and most recently in Red Hat Enterprise Linux 8. There are a lot of technical changes that are outside the scope of this tutorial. However, what you should know, is that in their most basic form, DNF and YUM are totally interchangeable. So much in fact that YUM is now a symbolic link to DNF.
[savona@putor ~]$ ls -l /usr/bin/yum
 lrwxrwxrwx. 1 root root 5 Nov 13 06:09 /usr/bin/yum -> dnf-3
In this article we are going to exclusively use the DNF command. But in older Red Hat or CentOS systems (7 and below) you can use all these same commands with YUM.
Viewing DNF Update / Transaction History
DNF keeps a running history of every command and transaction that it executes. You can view this history by simply providing the history option to dnf.
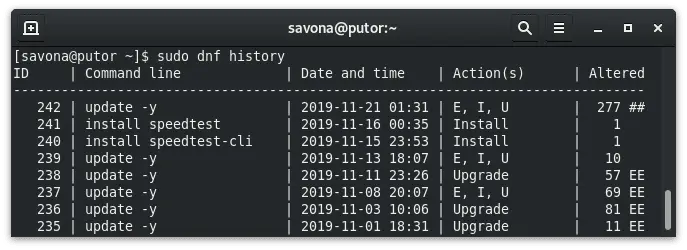
As we can see from the screenshot above, I have used DNF 242 times since I built my system. Each time I entered a command, DNF saved the information to the table. The following columns of information are displayed:
- ID: A unique identifying number for each transaction
- Command Line: The actual command used to start the transaction
- Date and time: When the command was issued
- Actions: The actions DNF took to complete the requested transaction (see below)
- Altered: The number of packaged altered to complete the transaction.
NOTE: YUM also shows the login user column in this listing.
The actions column shows the name (or abbreviation) of the action or actions taken during that particular run. Here is a list of possible values in the action field and what they mean.
- Install (I): At least one package has been installed
- Update (U): At least one package has been updated
- Reinstall (R): At least one package has been reinstalled
- Downgrade (D): At least one package has been downgraded to an older version
- Erase (E): At least one package was removed
- Obsoleting (O): At least one package was marked as obsolete
Searching DNF History for Specific Transactions
There are multiple ways you can narrow down the list of transactions. There are some built in commands and of course there are the old faithfuls.
List Last DNF Transaction Only
To see the last transaction only, we can pass “last” as an argument to list, like so:
[savona@putor ~]$ sudo dnf history list last
ID     | Command line             | Date and time    | Action(s)      | Altered
-------------------------------------------------------------------------------
   242 | update -y                | 2019-11-21 01:31 | E, I, U        |  277 ##
List DNF Transaction x Number Ago
You can further refine you search by using last-x, with x representing the number of transaction ago. For example, let’s say we want to find the transaction ran 11 times ago.
[savona@putor ~]$ sudo dnf history list last-11
ID     | Command line             | Date and time    | Action(s)      | Altered
-------------------------------------------------------------------------------
   231 | install clusterssh       | 2019-10-19 08:51 | Install        |   11
List DNF Transaction by ID or Range of IDs
You can also specify the ID you want to view.
[savona@putor ~]$ sudo dnf history list 133
ID     | Command line             | Date and time    | Action(s)      | Altered
-------------------------------------------------------------------------------
   133 | update -y                | 2019-01-16 22:22 | E, I, U        |   85
Or you can specify a range of IDs, like so:
[savona@putor ~]$ sudo dnf history list 36..38
ID     | Command line             | Date and time    | Action(s)      | Altered
-------------------------------------------------------------------------------
    38 | upgrade --refresh        | 2018-05-02 00:50 | Upgrade        |    1 EE
    37 | update -y                | 2018-05-02 00:46 | E, I, U        |  118 EE
    36 | update -y                | 2018-04-28 22:50 | E, I, U        |   15 EE
Using External Tools to Narrow Down DNF History
All of the external tools used to manipulate output can be used here. The most helpful example would be grep. You can use grep to search DNF history for that time you installed neofetch to make a cool MOTD screen.
[savona@putor ~]$ sudo dnf history list | grep neofetch
   205 | install neofetch -y      | 2019-05-17 19:17 | Install        |    8
Getting Detailed Information on DNF Transactions
Now that you know how to view and search your DNF transaction history, you may need more information. To get more information about a particular transaction, we can use the “info” option. This provides more detailed information about the transaction including things like:
- User who ran the transaction
- Return code
- Release version
- Packages that were modified
Let’s get more information about that neofetch installation we talked about earlier. We know the ID is 205, so let’s pass the ID as an argument to info like so:
[savona@putor ~]$ sudo dnf history info 205
Transaction ID : 205
Begin time     : Fri 17 May 2019 07:17:23 PM EDT
Begin rpmdb    : 2280:1a0424aad36bf8a5e6083ca084fa4b4eea570eea
End time       : Fri 17 May 2019 07:17:26 PM EDT (3 seconds)
End rpmdb      : 2288:e854e073f985659cf10e2518b40c897c3565b7cf
User           : savona <savona>
Return-Code    : Success
Releasever     : 30
Command Line   : install neofetch -y
Packages Altered:
    Install caca-utils-0.99-0.41.beta19.fc30.x86_64  @fedora
    Install gdk-pixbuf2-xlib-2.38.1-1.fc30.x86_64    @fedora
    Install giblib-1.2.4-28.fc28.x86_64              @fedora
    Install imlib2-1.4.9-8.fc30.x86_64               @fedora
    Install jp2a-1.0.7-4.fc30.x86_64                 @fedora
    Install neofetch-6.0.0-2.fc30.noarch             @fedora
    Install scrot-0.8-20.fc30.x86_64                 @fedora
    Install w3m-img-0.5.3-41.git20180125.fc30.x86_64 @fedora
This comes in handy for seeing dependencies that were installed with a package.
Taking Actions On DNF History Transactions
There are a few different actions you can take on the transactions that are in history. In my opinion the most important are undo and rollback. These two have saved my neck more than once. At first glance it may look like they do the same thing. The manual explains the differences in very terse language. Let’s look at the differences between undo and rollback before we explore how to use them.
DNF History Rollback vs DNF History Undo
Simply put the undo option only undoes that specified transaction. For example, our installation of neofetch is transaction ID 205 and installed 8 packages.
[savona@putor ~]$ sudo dnf history list 205
ID     | Command line             | Date and time    | Action(s)      | Altered
-------------------------------------------------------------------------------
   205 | install neofetch -y      | 2019-05-17 19:17 | Install        |    8
If we used undo, it would simply do the opposite, which is to remove those 8 packages.
If we use rollback, it would “Roll the system back” to it’s configuration before those packages were installed. Meaning it would undo ALL transactions between 205 and the latest, which in my case is 242.
Below we use examples to demonstrate the differences a little better.
Undo Transactions with DNF History
In this example we want to undo the installation of calc. Since we installed calc, we also installed zypper and pyzy. Let’s see how that looks in the DNF history view.
[savona@putor ~]$ sudo dnf history list | head -n5
ID     | Command line             | Date and time    | Action(s)      | Altered
-------------------------------------------------------------------------------
   245 | install pyzy             | 2019-11-24 12:30 | Install        |    2
   244 | install zypper           | 2019-11-24 12:26 | Install        |    7
   243 | install calc             | 2019-11-24 12:25 | Install        |    3  <
Now, let’s undo the calc installation. We will simply call dnf history undo and give it the ID of the transaction we want to undo.
[savona@putor ~]$ sudo dnf history undo 243
Last metadata expiration check: 2:00:21 ago on Sun 24 Nov 2019 10:31:16 AM EST.
Undoing transaction 243, from Sun 24 Nov 2019 12:25:32 PM EST
    Install calc-2.12.7.2-4.fc31.x86_64       @fedora
    Install calc-libs-2.12.7.2-4.fc31.x86_64  @fedora
    Install calc-stdrc-2.12.7.2-4.fc31.x86_64 @fedora
Dependencies resolved.
================================================================================================================================================
 Package                           Architecture                  Version                                   Repository                      Size
================================================================================================================================================
Removing:
 calc                              x86_64                        2.12.7.2-4.fc31                           @fedora                        2.7 M
 calc-libs                         x86_64                        2.12.7.2-4.fc31                           @fedora                        1.1 M
 calc-stdrc                        x86_64                        2.12.7.2-4.fc31                           @fedora                        949 k

Transaction Summary
================================================================================================================================================
Remove  3 Packages
...OUTPUT TRUNCATED...
As you can see in the truncated output above, it simply removed the 3 packages. It removed calc and it’s two dependencies that installed along with it in transaction 243.
History does not delete ID 243 after it is undone. DNF simply adds another ID showing the new undo transaction.
[savona@putor ~]$ dnf history list | head -n6
ID     | Command line             | Date and time    | Action(s)      | Altered
-------------------------------------------------------------------------------
   246 | history undo 243         | 2019-11-24 12:31 | Removed        |    3
   245 | install pyzy             | 2019-11-24 12:30 | Install        |    2
   244 | install zypper           | 2019-11-24 12:26 | Install        |    7
   243 | install calc             | 2019-11-24 12:25 | Install        |    3  <
Roll Back Updates with DNF History
For this example, let’s say we updated our system and everything went great. Then we installed some packages (xs, bygfoot, and vtun) that are causing issues. Let’s see what the history of this looks like.
[savona@putor ~]$ dnf history list | head -n6
ID     | Command line             | Date and time    | Action(s)      | Altered
-------------------------------------------------------------------------------
   252 | install vtun             | 2019-11-24 12:46 | Install        |    1
   251 | install bygfoot          | 2019-11-24 12:45 | Install        |    1
   250 | install xs               | 2019-11-24 12:45 | Install        |    1
   249 | update -y                | 2019-11-24 12:44 | Upgrade        |   42 EE
Now we want to roll back to the point before we install the xs package. Since we are rolling back, this means every transaction will be undone between the ID we specify and the last transaction.
It is important to realize that the ID specified will NOT be undo. Think of it as the place you want to return to. In this case we want to return the system to the state it was in after we updated the system, which is ID 249.
[savona@putor ~]$ sudo dnf history rollback 249
Last metadata expiration check: 2:19:39 ago on Sun 24 Nov 2019 10:31:16 AM EST.
Rollback to transaction 249, from Sun 24 Nov 2019 12:44:19 PM EST
  Undoing the following transactions: 250, 251, 252
    Install bygfoot-2.3.2-20.fc31.x86_64    @fedora
    Install vtun-3.0.4-9.fc31.x86_64        @fedora
    Install xs-1.1-8.git22afec1.fc31.x86_64 @fedora
Dependencies resolved.
================================================================================================================================================
 Package                        Architecture                  Version                                      Repository                      Size
================================================================================================================================================
Removing:
 bygfoot                        x86_64                        2.3.2-20.fc31                                @fedora                        6.2 M
 vtun                           x86_64                        3.0.4-9.fc31                                 @fedora                        160 k
 xs                             x86_64                        1.1-8.git22afec1.fc31                        @fedora                        532 k

Transaction Summary
================================================================================================================================================
Remove  3 Packages
...OUTPUT TRUNCATED...
As you can see, we removed the 3 packages that were install after the system update (ID 249) but left the update intact.
Redo Transactions with DNF History
You also have the option to “redo” a transaction. For example, let’s say we want to redo the byfoot installed that was part of our rollback above. We can simply pass the ID to the redo command like so:
[savona@putor ~]$ sudo dnf history redo 251
Last metadata expiration check: 2:25:25 ago on Sun 24 Nov 2019 10:31:16 AM EST.
Repeating transaction 251, from Sun 24 Nov 2019 12:45:38 PM EST
    Install bygfoot-2.3.2-20.fc31.x86_64 @fedora
================================================================================================================================================
 Package                          Architecture                    Version                                 Repository                       Size
================================================================================================================================================
Installing:
 bygfoot                          x86_64                          2.3.2-20.fc31                           fedora                          1.6 M

Transaction Summary
================================================================================================================================================
Install  1 Package
...OUTPUT TRUNCATED...
That’s it, it will simply redo what took place in that transaction.
Conclusion
The DNF history is an important command to know when working as a Linux System Administrator or DevOps Engineer. It allows you to manipulate DNF transactions with ease. It also allows you to easily recover from botched updates that cause issues with your system.
In this article we discussed viewing the DNF history, viewing detailed transaction information and how to rollback or undo updates and installations. You should be comfortable working with the DNF or YUM history now.
If you enjoyed this article please show your support by following us on Facebook, Twitter or Subscribing to our YouTube Channel. As always we would love to hear from you in the comments below.
does the rollback delete all the files that i saved on the system since the last update? how do i fix that?
I am not sure what you are talking about. Can you clarify? It will not affect personal data stored in your home directory, or other data. Only updates and package installations.
So it only reverses the updates?
That is correct. It doesn’t not remove data from your home directory or any other data that is not related to the updates.
good article!
Unfortunately, it is common that old packages are not retained in the repos when new packages are released. So, you’ll often encounter
No package <name-version> availableerrors.See: https://bugzilla.redhat.com/show_bug.cgi?id=1297189
This is interesting. Are you saying that as soon as a new version of a package is released it replaces the old one?