Here I will outline my adventures in learning how to connect a PIR (passive inftared) sensor to my raspberry pi 3 in order to sense motion and turn off the monitor / display to my magic mirror when nobody is around and automatically turn on when someone stands in front of it.
Major Components
First, let’s dive through the items you will need (with links to them on amazon):
1) Raspberry Pi 3 (I used Model B)
I am not going to go through the install process of the raspberry pi. I am going to assume you have it running the latest raspbian already.
2) PIR Sensor
I did some research and it looks like the Adafruit PIR sensor was the way to go. You can purchase any kind you like.
3) Pin Connectors
I am new to this, so I bought this cheap little kit.
4) Crimping Tool
Again, I am new to this, so I bought the cheapest option available. I don’t expect to be using this often.
Again, I am new to this, so I bought the cheapest option available. I don’t expect to be using this often.
Understanding Pin & Wiring Configuration
The hardest part for me was figuring out the pins and wiring. So let’s tackle that first. Let’s gather the parts we need and assemble the pir sensor and connectors.
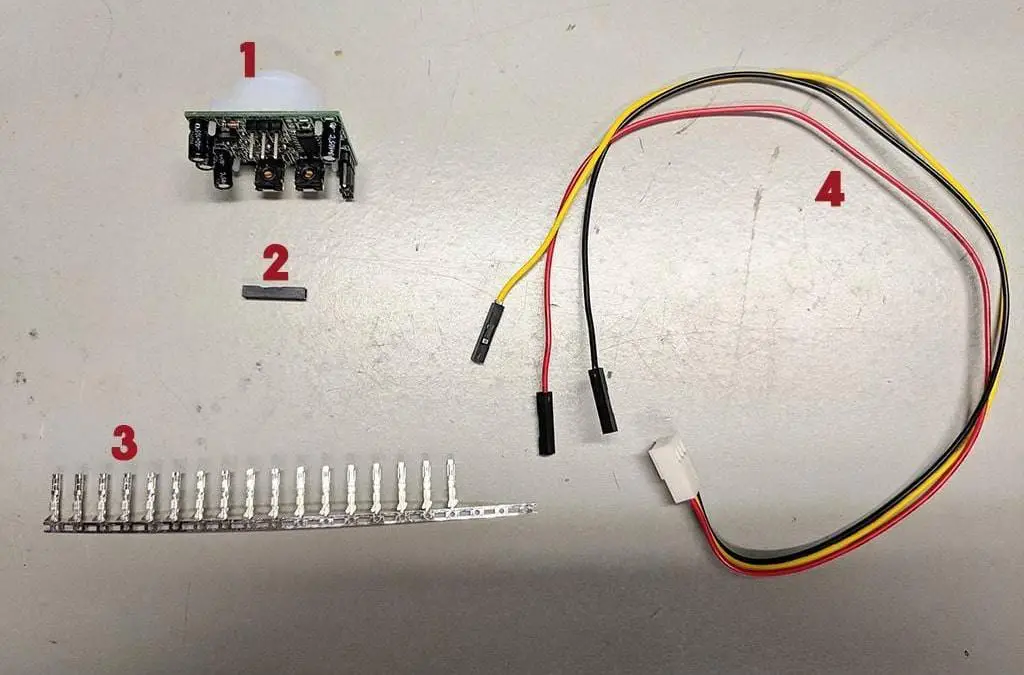
Parts Needed to Complete Wiring Assembly
NOTE: The cable in the photo is the finished product, it should have bare cable at the end with the black pieces when you start.
- PIR Sensor
- 3x 2.54mm 1P Dupont Connector Housing
- 3x Dupont Female Pin Connector
- PIR Sensor Cable
Crimp the ends of the wires into the female pin connectors then slide them into the connector housing. When you are done the cable should look like it does above.
Connecting the PIR sensor to the GPIO Pins
Now that your cable is ready to go, let’s see what these cables do.
If you look at the bottom of the PIR sensor, you will see 3 pins (pictured above). If you look really hard at the board (base of the pins) you will see they are labeled. I am old, so I use a jewelers loop or magnify glass to read them.
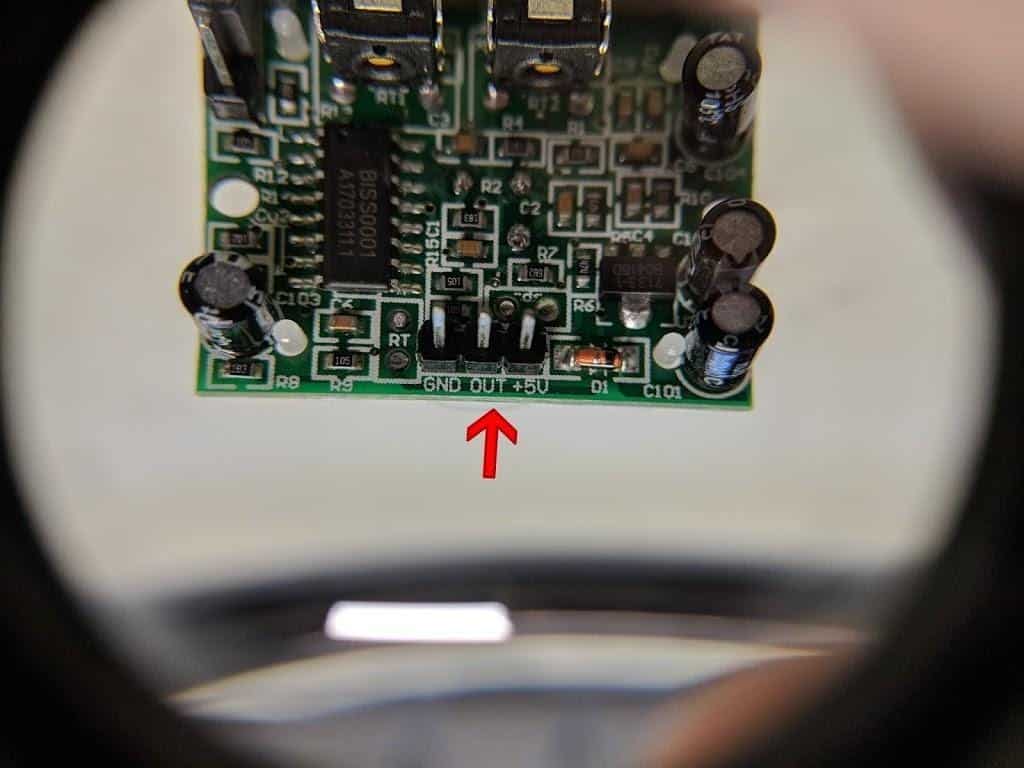
As you can see they are labeled:
- GRD (Ground)
- OUT (Control Channel)
- +5V (5 Volt Power)
The “Control Channel” is probably called something else. What the PIR sensor does is send a small change in voltage to this pin to tell it something has changed. This is how the board knows when there is motion, by sensing this small change in voltage.
For more expert information on how PIR sensors work, there is a great resource on the adafruit website here.
When you connect your three pin connect (white on cable) to the board, you want to ensure the black cable is on the GRD (Ground) side and red is on the 5V (power side).
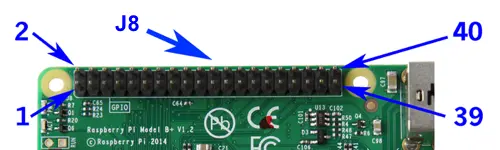
Now we have to connect the cables to the corresponding pins on the board of the Pi. Before we do, it is a good idea to understanding the pin numbering scheme and the pinout (which pin does what).
Here is an image I found somewhere explaining the pin numbering.
Here is an image I found on the interwebs showing the pinout. The numbers on this chart are the “GPIO Numbers” which are different from the pin numbers.
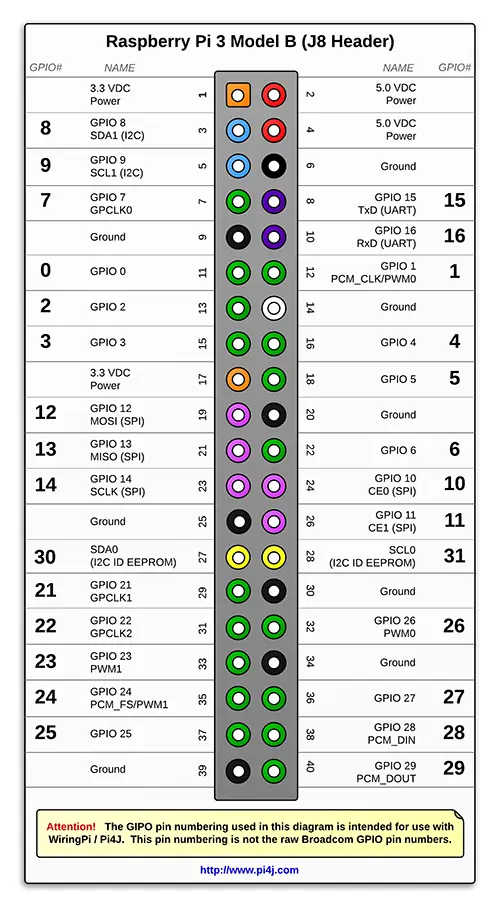
You can find more information about GPIO from the raspberry pi GPIO documentation.So we need to connect the red cable to a 5 Volt power pin, the black cable to a ground, and the yellow cable to a control pin. This is how I chose to connect to the board:
- Red to Pin 2 (5v)
- Block to Pin 6 (Ground)
- Yellow to Pin 11 (Control)
NOTE: I am using the small numbers aligning with the inside of the pins on the diagram.
Now that we have the PIR sensor all cabled up and connected to the Pi board, we need some software to test it.
Create Script to Test Connectivity
Open a terminal or ssh into your Raspberry Pi. We are going to create a python script so open your favorite editor (I use VIM, again, because I am old) but you can use nano or anything your comfortable with. I called the file test.py.
Add the following lines to the file:
import RPi.GPIO as GPIO
import time
import subprocess

GPIO.setwarnings(False)
GPIO.setmode(GPIO.BOARD)
GPIO.setup(11, GPIO.IN)
while True:
    i=GPIO.input(11)
    if i==0:
        print "Not Sensing Motion",i
        time.sleep(0.1)
    elif i==1:
        print "Motion Detected",i
        time.sleep(0.1)
Make sure you keep the indents, python is pretty picky about those sorts of things. Also, if you chose to use a different pin that I did, you will need to change the GPIO.setup and GPIO.input lines to reflect your pin number.
Now we have all the pieces we need to run our first test.
Ensure the PIR sensor is facing away from you so you do not trigger it. Then on the command line and in the same directory that you made the above file, type the following to run the script:
$ python test.py
It should start scrolling either “Not Sensing Motion” or “Motion Detected”. If it is saying “Not sensing motion” that means the PIR sensor is sending a low output to the board because it doesn’t “see” anything. If you wave your hand in front of it, it should raise the output to the board and print out “Motion Detected”.
NOTE: There is sleep in the script so it might take a very short time to change.
If this worked, your PIR sensor is now setup and ready to be used by the Raspberry Pi. If it didn’t work, you will have to try some troubleshooting. Make sure the pins are in the correct place, make sure all your wire connections are good, check the connector to the PR sensor is on correct, etc… Feel free to comment below and I will try to chime in and help if I can.
Creating the Code to Allow the PIR Sensor to Interface with Raspberry Pi
Now that I have my PIR sensor working, I need a script to constantly run and look for motion. When it see’s motion, it will turn the monitor on, after a short delay, it will turn the monitor off and wait to see motion again.
I found a website that was doing something similar but for a photo frame. We will be adjusting his script to work for our needs.
For this to work, we need two bash scripts, one to turn the monitor on, and on to turn the monitor off.
NOTE: There are several ways to turn the monitor off from the command line, I chose the vcgencmd command because it was the quickest and least destructive.
Create a file called monitor_on.sh and add the following lines:
vcgencmd display_power 1 > /dev/null
Now create a file called monitor_off.sh and add the following lines:
vcgencmd display_power 0 > /dev/null
Set both of these files to be executable:
chmod +x monitor_o*
You can test these by running the commands or the scripts, but do it via SSH so your display doesn’t turn off and leave you typing in the dark.
Running this command:
./monitor_off.sh
Should turn off your monitor, and running:
./monitor_on.sh
Should turn it back on.
Now we make the python script a new file, I called mine pir.py, with the following lines:
NOTE: You might have to change the paths to the scripts.
#!/usr/bin/env python

import sys
import time
import RPi.GPIO as io
import subprocess

io.setmode(io.BOARD)
SHUTOFF_DELAY = 3 # seconds
PIR_PIN=11

def main():
    io.setup(PIR_PIN, io.IN)
    turned_off = False
    last_motion_time = time.time()
    while True:
        if io.input(PIR_PIN):
            last_motion_time = time.time()
            sys.stdout.flush()
            if turned_off:
                turned_off = False
                turn_on()
        else:
            if not turned_off and time.time() > (last_motion_time + SHUTOFF_DELAY):
                turned_off = True
                turn_off()
            if not turned_off and time.time() > (last_motion_time + 1):
                time.sleep(.1)
def turn_on():
    subprocess.call("sh /home/pi/MagicMirror/monitor_on.sh", shell=True)

def turn_off():
    subprocess.call("sh /home/pi/MagicMirror/monitor_off.sh", shell=True)

if __name__ == '__main__':
    try:
        main()
    except KeyboardInterrupt:
        io.cleanup()
This sets the shutoff delay to 3 seconds for testing. Once I am sure it works as intended I will change the line:
SHUTOFF_DELAY = 3 # seconds
to
SHUTOFF_DELAY = 600 # seconds is 10 minutes
So the device stays on for a while.
Enabling Script to Run Automatically on Boot
I would like to make this script run automatically in the background and start on boot. In order to do that I am adding it to the autostart file location in ~/.config/lxsession/LXDE-pi.
I just add the following line:
@sudo /usr/bin/python /home/pi/MagicMirror/pir.py
That’s it.. Make some adjustments to suite your neeeds and have fun!
Hello,
Thanks for a great tutorial. I’ve followed all of your instructions, but still cannot seem to get my MagicMirror to turn off and on with the PIR sensor.
The sensor does work, I use the test.py script and can see motion detection and no detection.
The monitor_on and monitor_off scripts also work, I have tested them as well.
However, I did not have a ~/.config/lxsession/LXDE-pi./autostart file (the directory did not exist). I did create the directory and included all the usual startup information in there along with the above script (both in @sudo and without @sudo forms). Nothing seems to work, my monitor never turns off.
I also attempted to put the information in the all user autostart file (located within etc/xdg/lxsession/LXDE-pi/autostart), but this also isn’t working.
I have run the chmod +x monitor_o* command to make the files executable as well.
Any thoughts? Thank you.
Additionally, if I just run the pir.py script in the command line I get a Line 13 syntax error, this might be where the error is. I cut and pasted the pir.py code as described above though.
John, sorry for your issues. I am away from home and working from my phone here, but I think I see the issue. It looks like the website formatting is messing with the script. I updated the script in the post and tried to be careful with the formatting. Please copy and paste it again and let me know if it works for you. If not we can troubleshoot more when I am at the keyboard and have a little more flexibility.
Perfect! Works like a charm now. Thank you so much! Now to hang it on the wall!
Glad to hear! I would love to see some photos! If you use the contact form I will give you an email address to send the photos to and then I will post them here.
Sadly, I was a little too quick out of the gate. The script (pir.py) when run from the command line now runs properly, however the script does not autorun at startup. As I posted above, when first doing this I did not have a ~/.config/lxsession/LXDE-pi/autostart file, so I created the file and the associated directory (didn’t have lxsession/LXDE-pi/autostart). I did have the default (etc/xdg/lxsession/LXDE-pi/autostart), so I’ve put the @sudo /usb in both places but nothing is working.
Hmmm. I noticed in your first comment, that you can a period in the path after the word pi.
~/.config/lxsession/LXDE-pi./autostart
The path should be:
~/.config/lxsession/LXDE-pi/autostart
Here is my file:
$ cat ~/.config/lxsession/LXDE-pi/autostart
@unclutter -display :0 -idle 3 -root -noevents
@xset s noblank
@xset s off
@xset -dpms
@xrandr –output HDMI-1 –rotate right
@sudo /usr/bin/python /home/pi/MagicMirror/pir.py
Hey John, just wondering if you ever fixed the issue?
Having problems locating where the start up file is to put the script. Can’t find the one you say. Any updates I need to know about? Thanks!
You looked in ~/.config/lxsession/LXDE-pi ?? Do these folders exist for you? You may have to create them. Here is what is in my file:
@unclutter -display :0 -idle 3 -root -noevents
@xset s noblank
@xset s off
@xset -dpms
@xrandr –output HDMI-1 –rotate right
@sudo /usr/bin/python /home/pi/MagicMirror/pir.py
a Thanks for your quick reply. I am new at this MagicMirror thing. Through much struggle and studying I now have a very nice WORKING Mirror that I will be giving my son. The PIR is the final step. So this is what I think might be happening. We must have 2 different versions of Raspien or 2 different versions of pi. I do not have ~/.config/lxsession/LXDE-pi . What I have is the following.. /etc/xdg/autostart,libfm,lxpanel, lxsession-(LDXE, LDXE-pi). These 2 files are in the lxsession file. All these files are not in the /home/ file. There are no sub folders in the autostart or the LDXE AND LDXE-pi. My MagicMirror is in /home/pi. My monitors on off are in /home/pi and my pir.py is in MagicMirror file. I have confirmed that the sensor works. That’s about it. Thanks again for your help.
The files you listed are the global autostart files. You don’t want to use those, you want user specific autostart files. This needs to be done in your home directory.
Use the following commands to create the folder structure and the file
Create the file structure:
mkdir -p ~/.config/lxsession/LXDE-pi
Create the file and add the script line:
echo ‘@sudo /usr/bin/python /home/pi/MagicMirror/pir.py’ >> ~/.config/lxsession/LXDE-pi/autostart
NOTE: Each of the commands above should be on one line.
Then you should be good to go.
Keep me posted. If you need more help we can continue here or maybe we can jump on a chat.
Ok will give that a try thanks!
Be sure to let us know how it works out.
Hello again, well everything works but something has happened that I didn’t expect. When I ssh into my pi to pm2 stop MagicMirror I get the road on my desktop but no icons. I put the pir.py into my root directory because when I put it in to my MagicMirror directory it wouldn’t shut off. My monitors are still in The MagicMirror dir. I created the file you said and put in the autostart @sudo /usr/bin/python /home/pi/pir.py. But the reboot gives me. A mirror that stay on for 25 seconds then goes off until I hit the PIR. Where’s the rest of my desktop? Thanks
I am not sure I understand what you are saying. Are you saying that when you stop MagicMirror you cannot get back to your desktop?
All I have as a desktop is the background picture of that Long Road into the sunset. Nothing else. It’s wierd.
That is weird, can you post what you put into your autostart file?
I have @sudo /user/bin/python /home/ pi/pir.py could the “echo @sudo/use/bin/python /home/ pi/MagicMirror/pir.py” have removed some files from the auto start that shouldn’t have been removed? You know I have entered in so much code to get this to work. I could have deleted something by accident that needs to be there. What files need to be present to show the whole desktop and I will just ssh them in.
The echo command that I left a few comments up will delete the autostart file, but there shouldn’t be anything in there that controls your desktop unless you had some weird configuration.
Did you upgrade packages recently or make any other changes?
Well like I said I’ve tried a lot of things to get this to work but I thought I went back to those files and removed the changes. I have dice got another pi up and runnig and have been looking at the start up files there. I am about to compare that with what the magic mirror pi has to see what the difference is. If I have to I will be copying over some files. Does the original start up files originate out of the global auto start and where are those at? I can search but if you know it would save me some time.
The global is at /etc/xdg/autostart.
If you are still having issues you should post in the magicmirror forum. I am active there as well.
Yea I like that forum. Well thanks for your work on pir. It’s working fine on my Mirror. Have a great day. Look forward to our next adventure.
Glad to hear it all worked out!
What can you add to make it where the display does not turn on after a certain time? Like set not activations at night from 10PM to 6 AM?
I have a DAKboard setup with a cron entry.
How are you turning on the display now? Are you using the above python script?
Thank you for your response.
I’m using the instructions they provide on their website at https://blog.dakboard.com/diy-wall-display/. I’m controlling the display with this script, /home/pi/rpi-hdmi.sh. The contents of the script I got from here, https://gist.github.com/quelleck/1d8fc8395fd52d4aa38a99ef46d8598e
Then, I’m using the crontab -e, to time the on and off.
# Turn HDMI Off (22:00/10:00pm)
0 22 * * * /home/pi/rpi-hdmi.sh off
# Turn HDMI On (7:00/7:00am)
0 7 * * * /home/pi/rpi-hdmi.sh on
So you are use cron to turn off the display completely at 10pm then back on at 7am. This is different that what we are doing. We are using a PIR sensor to only turn on when someone is in front of the mirror.
But, If you wanted to add something to your script to not allow it to run between 2200 and 0600 you can do something like this:
ctime=$(date +%H:%M)
if [[ "$ctime" > "22:00" ]] || [[ "$ctime" < "07:00" ]]; then
        exit
else
        # Insert script here
fi
If the time is between 2200 (10pm) and 0700 (6am) then the script will just exit and not run the rest of the code.
Yes, I didn’t want late night fridge raids to turn on the monitor. I will add the code you suggested above to the pir.py script you provided. I have ordered the PIR sensor and will report back after I get it installed.
Question:
pir.py, as modified, will perform a time check every time the PIR sensor is activated, correct? Not just during boot up?
Thank you.
The code I provided is bash script not python. I was providing it to compliment the code you linked to at github. It will not work with python, or the pir.py script.
If you are using the code I provided in the post, you can add the above to the monitor_on.sh script. This will stop the monitor from powering on between those times.
I hope that is clear. The situation is getting kind of muddied.
Thank you very much for this guide! You saved my project! As a complete python and electronics noob, I didn’t know what my mistakes are. Everything works flawlessly and I’m glad I found you 🙂
I am glad it helped!
Thanks for the tutorial and python code Steven Vona.
Few suggestions regarding the python code:
1) Python keeps hogging cpu because there is no sleep in all the If conditions. I have modified it as below
if io.input(PIR_PIN):
last_motion_time = time.time()
sys.stdout.flush()
if turned_off:
turned_off = False
turn_on()
time.sleep(.1)
else:
if not turned_off and time.time() > (last_motion_time + SHUTOFF_DELAY_1):
turned_off = True
turn_off()
if not turned_off and time.time() > (last_motion_time + 1):
time.sleep(.1)
if turned_off:
time.sleep(.1)
This keeps the cpu idle and sane also keeping the cpu temperature normal
2) Using python3 instead of python2
Hi, when I run the testscript it shows, that the sensor is dectecting motions all the time. Only when I disconnet the sensor it shows, no motion.
I have tried different sensor but its allways the same. Have you any idea?
Are you sure there isn’t motion in front of the sensor? Also, are you sure you have the right pin configuration? I was using pin 11.
This is great information, thanks!
As Sunil indicates, without a modification to the monitor script, python will use 100% CPU. I simply put a single sleep at the start of the while look and commented out the ending “if” statement. Works awesome now.
…
while True:
time.sleep(.1)
…
# if not turned_off and time.time()…
# time.sleep(.1)
Hello,
I hope this thread will still garner a response, even after a couple of years of silence. I’m struggling with a very weird problem. Situation is:
– confirmed PIR is working using your test.py as well as a similarly purposed script I found on a different site.
– confirmed monitor*.sh files work.
– testing pir.py on the command line results in the following behaviour: The monitor switches off after any sub-60 second period designated in the script, and then switches on again by itself after the missing number of seconds to make up 60 seconds. e.g. if I set a SHUTOFF_DELAY of 45, the screen turns off after 45 seconds as expected, and 15 seconds later, it spontaneously turns on again, with no motion taking place in front of the PIR. If I set SHUTOFF_DELAY to 30, the screen turns off after 30 seconds and then spontaneously turns on again after 30 seconds, with no motion in front of the PIR, and so on!
– If, with pir.py autostarted, I run test.py, it claims motion was detected at the point the screen turns on again by itself, even though absolutely no motion is taking place (I even put a cup over the PIR to be doubly sure it wasn’t somehow being triggered)
Any clue what could be going on here?
I am sorry, I have been done with this project for a long time. I don’t have the means to test anything.
Turns out it was RF interference from the WiFi of the Pi. I guess it was sending a refresh/keep-alive/whatever once per minute and every time it did so, the PIR would detect movement, i.e. false positive. Turning WiFi off confirmed WiFi as the source of the problem, as the false positives immediately ceased. Unfortunately I needed WiFi enabled for my project, so had to find a solution, and did: I extended the length of the wiring (from about 20cm to about 1m) between the PIR and the Pi, in order to put some distance between the two. It did the trick. No more interference, no more false positives at exactly one minute intervals!
Thats great! Hopefully that will help someone else as well.
Howdy! Planning out my project and was wondering: can the motion sensor be tied to either dimming the display or disabling the hdmi ouput of the pi vs turning it the display completely? The monitor I want to use (have on hand) has a slow turn on time.