There have been many stories about people discarding old computers only to have someone pick them out of the trash. Most of the time this is for innocent enough reasons. However, there is a real threat to someone getting there hands on your old hard drive. Since most people do not encrypt their drives someone can very easily pull all the data off of these old discarded hard drives. In this article we will discuss how to securely erase a hard drive before disposal. This method is effective on any SATA / PATA hard drive, including destroying hard drives from a system running Windows or any other operating system.
WARNING: This article provides methods that will destroy ALL data on your hard drive. If not used correctly unintended data loss may occur. When possible, we recommend backing up ALL data and disconnecting any drives that you do not intend to erase. DO NOT copy and paste commands from this article unless you are 100% sure you are using the correct syntax.
Securely Erasing SATA Drives Using hdparm Utility in Linux
For the last couple of decades manufacturers have been including a Secure Erase feature in the firmware of SATA/PATA drives including SSDs and traditional spinning disk hard drives. This Secure Erase feature tells the drive to write zeros to the entire disk. In the case of SSDs this feature will set the cells back to the factory default state, effectively erasing all data from the drive. We will use the hdparm utility to interface with the drive firmware and issue the Secure Erase command.
Install the hdparm Utility On Your System
[savona@putor ~]$ sudo dnf install hdparmor on Ubuntu / Debian:
sudo apt-get update -y
sudo apt-get install -y hdparm
Identify the Drive to Be Wiped / Security Erased
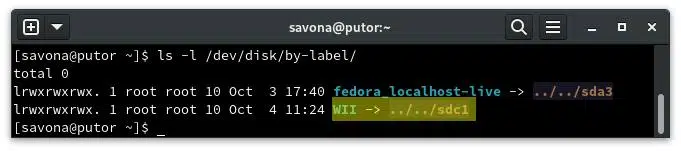
Now connect the drive to the computer and identify the device name. We can use fdisk or we can list out the /dev/disk/by-label/ directory. In this case I am using the latter, but fdisk is more reliable.
Here is an example output of the same disk using fdisk -l :
[savona@putor ~]$ sudo fdisk -l
Disk /dev/sdc: 465.76 GiB, 500107862016 bytes, 976773168 sectors
Disk model: MQ01ACF050
Units: sectors of 1 * 512 = 512 bytes
Sector size (logical/physical): 512 bytes / 512 bytes
I/O size (minimum/optimal): 512 bytes / 512 bytes
Disklabel type: dos
Disk identifier: 0x3078f272

Device     Boot   Start       End   Sectors   Size Id Type
/dev/sdc1  *       2048   2099199   2097152     1G 83 Linux
/dev/sdc2       2099200 976773119 974673920 464.8G 8e Linux LVM
Here I identified the /dev/sdc drive as the drive I want to securely erase. This step is VERY important. If you select the wrong drive you WILL destroy your data. For the rest of this article we will be using sdc, please ensure you do NOT copy and paste that into your system unless you are sure you know what you are doing.
Get Drive Information Using hdparm
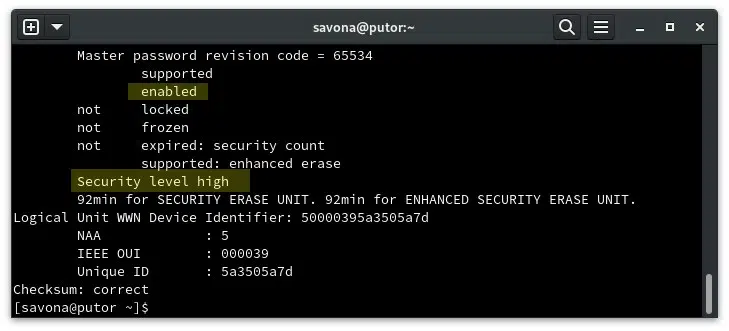
Let’s use the hdparm -I option to get some information directly from the drive. The information we are most interested in is if the drive support Enhanced Security Erasing, if the drive is frozen or not, and an estimated time to securely erase the disk.
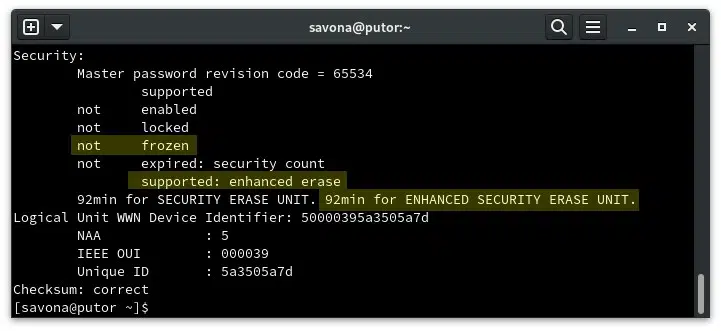
In this case, the drive reports not frozen and does support Enhance Security Erase. We can see that the estimated time to securely erase the disk is 92 minutes. If your drive does not support Enhanced Security Erase you can use basic Security Erase (read on for instructions).
NOTE: If the disk was in a frozen state, you can simply put the computer to sleep for approx 10 seconds. The drive should report not frozen when the computer wakes. Issue the following command to put the computer to sleep echo -n mem > /sys/power/state. This step is only required if the disk reports as frozen.
Create Security Credentials and Securely Erase Hard Drive Using hdparm
Now we have the disk identified and have ensured it is in the correct state. The next step is to set a master user and password to enable security on the drive.
[savona@putor ~]$ sudo hdparm --user-master user --security-set-pass pass /dev/sdc
security_password: "pass"

/dev/sdc:
 Issuing SECURITY_SET_PASS command, password="pass", user=user, mode=high
Here you can see that the master password / security report as enabled and the security level is set to high.
Now we have everything set to succussfully securely delete all data on this disk. Here we will pass the credentials we just created and issue the --security-erase-enhanced option with hdparm. This will tell the firmware to securely erase all the data on the disk.
WARNING: ALL DATA ON THE SELECTED DRIVE WILL BE ERASED AND NON RECOVERABLE. PLEASE ENSURE YOU BACKUP ALL DATA BEFORE.
[savona@putor ~]$ sudo hdparm --user-master user --security-erase-enhanced pass /dev/sdc
security_password: "pass"

/dev/sdc:
 Issuing SECURITY_ERASE command, password="pass", user=user
NOTE: If your drive does not support Security Erase Enhanced, simply remove the “enhanced” like so to use the basic Security Erase command.
sudo hdparm --user-master user --security-erase pass /dev/sdc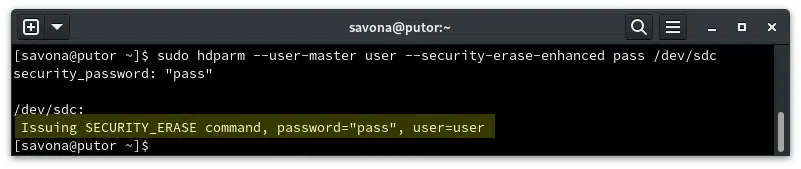
Conclusion
That is it. As you can see it is fairly easy to ensure a hard drive is securely wiped before disposing of it. As with anything in Linux there are always several ways to accomplish a task. In the past we have described how to securely erase single files and full disks using the Linux shred command. I prefer hdparm if trying to securely erase a SATA or PATA drive.