I rely heavily on my clipboard, probably because I have the attention span of a sugared up six year old. I often find myself trying to paste something only to find I overwrote my clipboard it with something else. This usually sends me on a hunt to find the original command or URL I needed. One day I decided enough was enough and went on the hunt for the perfect clipboard manager. After testing four different programs, I am happy to say I finally have cured my clipboard woes. GPaste saved the day!
What is a Clipboard Manager?
Before we go into what a clipboard manager is, I suppose we should mention what a clipboard is. When you copy, paste or cut, you are using the clipboard. You would be surprised how many people do not know the cut, copy, and paste program is called a clipboard. When you copy (highlight text and hit Ctrl+C or right click and select copy) you save that highlighted text to the clipboard. The clipboard usually only provides a single “slot” to save data and is overwritten with each new copy.
A clipboard manager is a program that adds functionality to the operating systems clipboard. The most basic function is to keep a running history of things saved to the clipboard for later use. As we will find out, GPaste builds on this with many more features.
GPaste Is the Best Clipboard Manager for Gnome
I have tried quite a few clipboard managers and in my opinion I have found GPaste to be the best. It provides all the functionality I need and more.
Beneficial Features of GPaste
- GTK+3 GUI provides a clean and refined interface
- Easily integrates with Gnome Shell
- Customizable keyboard shortcuts
- Searchable clipboard history
- Supports saving images to clipboard
- History settings for buffer size and memory usage
How to Install GPaste
You can install the necessary packages from your package manager. Below are the instructions for most popular operating systems.
Install GPaste on Fedora using DNF
sudo dnf install gnome-shell-extension-gpaste gpasteGpaste Install on Ubuntu / Debian Using APT
sudo apt install gnome-shell-extensions-gpaste gpasteInstall on CentOS 7 / Red Hat 7 Using the EPEL Repo
CentOS and Red Hat do not offer GPaste in their base repositories. You must first install the epel repository, the use yum to install the packages.
sudo yum install gnome-shell-extension-gpaste gpasteEnabling the GPaste Gnome Shell Extension
The shell extension provides a great interface for using GPaste. Once the packages are installed, You can enable the shell extention. Open GPaste (Applications > Gpaste) and then click the hamburger menu on the top right. There are a lot of settings here, turn on “Enable the gnome-shell extension”.

You may also have to enable it in the gnome tweak tool (Gnome Tweaks) also. Open Gnome Tweaks (Applications > Tweaks) and ensure extensions and Gpaste are enabled.

For more information on how to install and use the Gnome Tweak Tool, read “Customize Gnome 3 with the Gnome Tweak Tool“.
Using GPaste Clipboard Manager
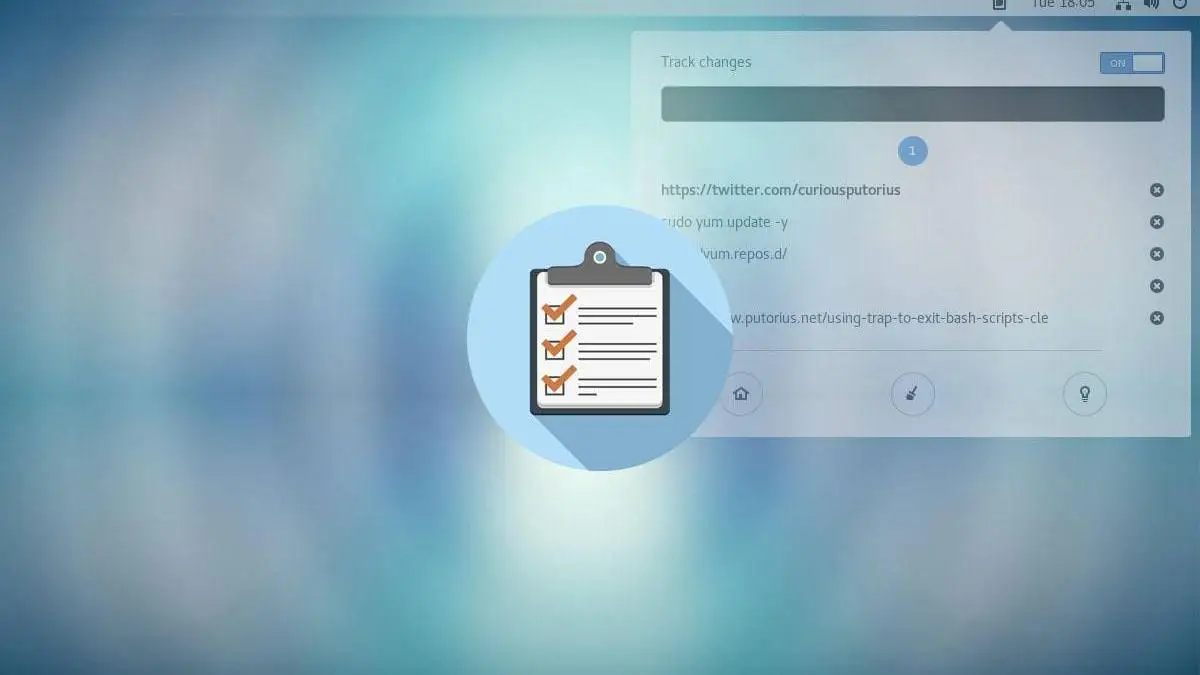
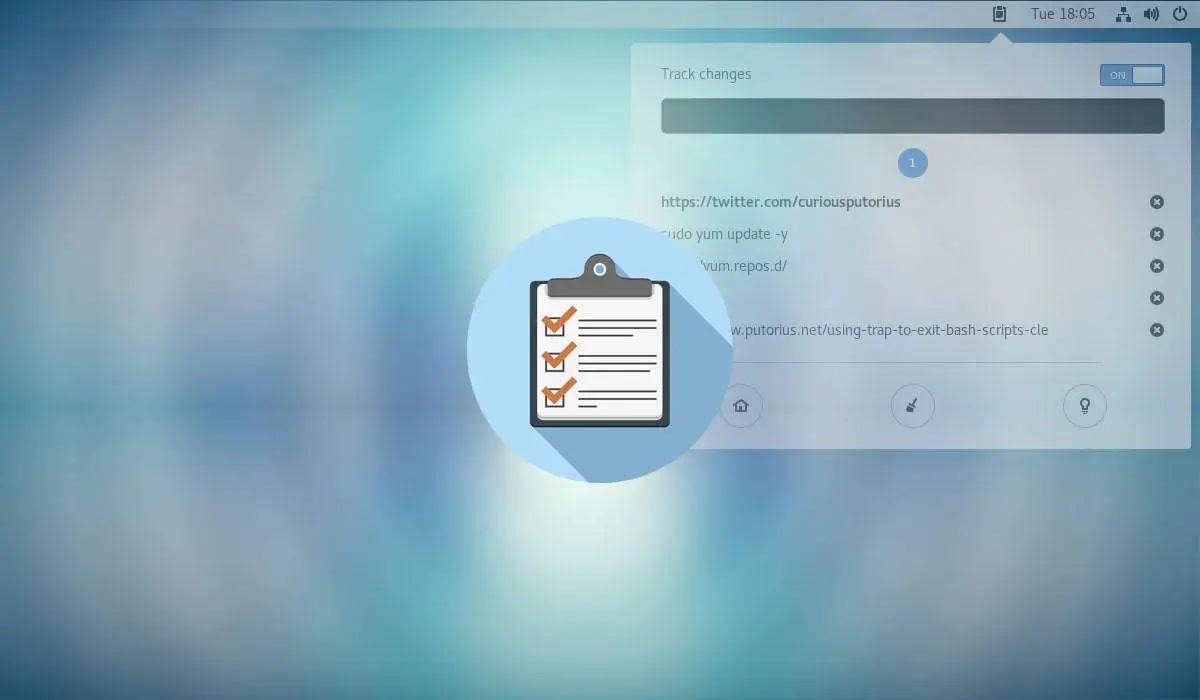
Once you have completed the steps above, you will notice a little clipboard icon in your top bar. This icon gives you quick access to your clipboard history and all of the features.
The toggle on the top allows you to turns on/off clipboard tracking. The dark bar under that is the search bar. I have my max history set to 500 items, so the search feature really comes in handy. The number 1 in the blue circle is the current page. As your clipboard history grows, GPaste will automatically paginate it for you. These are followed by your recently copied history. You can click on any item to put it back in the clipboard, or use the little x to delete that entry. The bottom icons are Home (go to main interface), Clean (delete all entries), and About (show version and contributor information).
The Main GPaste Interface Panel
You can view your history items and change the program settings from the main GPaste interface. To open it, click the home icon in the clipboard applet, or you can open it from the Applications menu.
The most important part of the main GPaste Interface is the settings. You can open the settings by clicking the three lines (hamburger menu) on the right of the panel.

Here you can set the main features of GPaste like enabling the Gnome shell extension, setting primary select affects history (Soon as you select something it adds it to history.. NICE!), and turn on image support.
Next onto the History settings by clicking the tab by the same name.
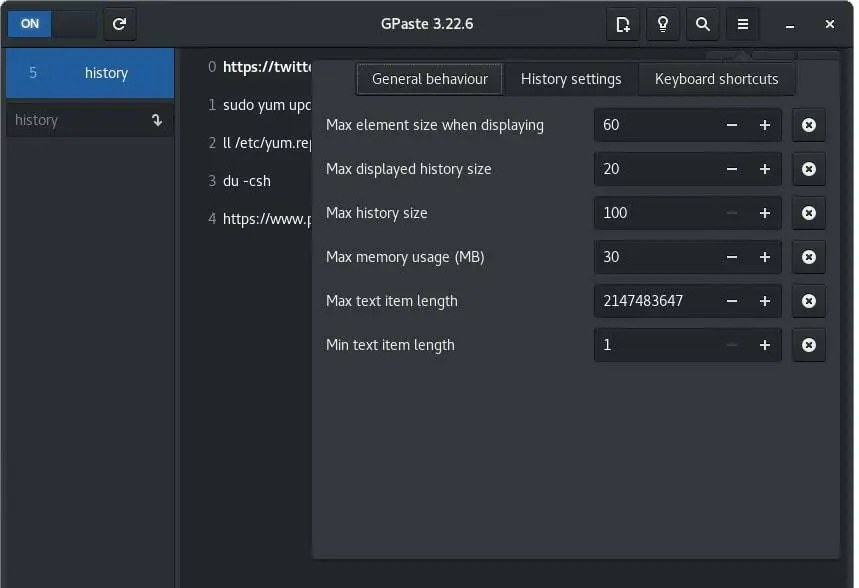
In the above window you can set all the parameters for your history buffer. You can set max history size, max memory usage, etc.
If you are like me and love keyboard shortcuts you will appreciate this section. Select the last tab to customize your keyboard shortcuts.
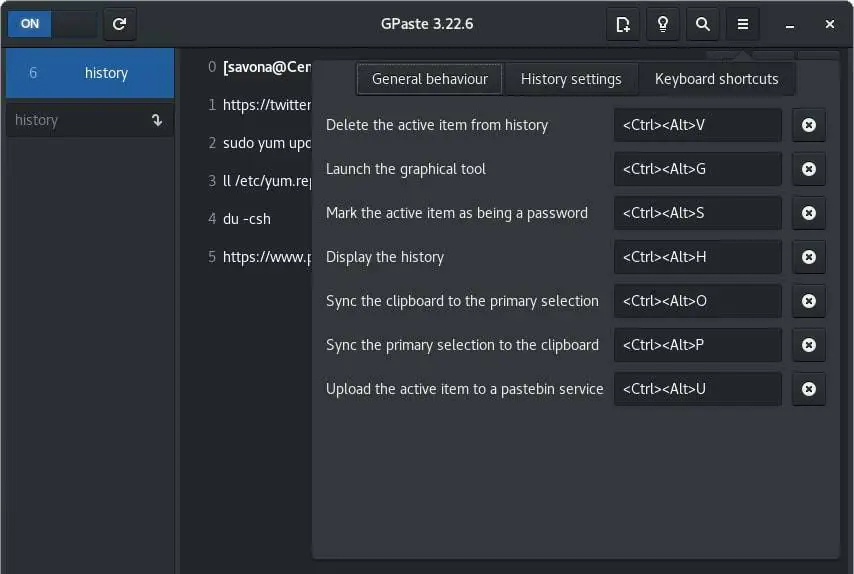
Here you can set keyboard shortcuts for actions you use often. The one I find most useful is “Sync the primary selection to the clipboard”. You can set this to whatever you like, however changing them is sometimes a little agonizing.
Conclusion
I quickly fell in love with GPaste and now I cannot imagine my workflow without it. It is one of the best utilities I have come across in some time. In this article we covered installing GPaste Clipboard Manager on Fedora, Ubuntu and CentOS. We discussed some basic usage and how to get to all the settings. If you decide to try GPaste, please be sure to come back and let us know what you think.
i just installed it and it was easy. now to try all the features
What was the other 4 clipboard managers that you tested?
There were 3 others Diodon, Parcellite, and Glipper.
I just wish to say I am beginner to blog and really enjoyed you’re website . Most likely I’m want to bookmark your site. You certainly come with good posts. Thanks a lot for revealing your blog site.
Fantastic posts. Thank you!
Ok, I have a hard time figuring out what “Sync the primary selection to the clipboard” and why it is useful. Do you have an example?