What is Banner Grabbing?
The first step in the penetration testing process is planning and reconnaissance. Banner grabbing is a reconnaissance technique that retrieves a software banner information. This banner usually contains important information about a network service, including but not limited to, it’s software name and version. FTP, Web, SSH, and SMTP servers often expose vital information about the software they are running in their banner.
Once the software name, version, and possibly other information has been gathered, it can be used to find vulnerabilities. A simple CVE search can on the software information can give a malicious actor, or pen tester, the information they need to compromise a service.
DISCLAIMER: You should only perform scanning and other penetration testing techniques on your own systems or with permission from the system owner.
How to Launch a Banner Grabbing Attack
A banner attack usually starts off with a enumeration scan to find open ports. Once you identified a service you want to target, you can send specific packets and inspect the traffic for the specified information. Let’s take a look at how to launch a banner grabbing attack with a few different tools.
Banner Grabbing using Telnet
One of the most common tools used for banner grabbing is telnet. It is widely available and very easy to use.
Installing Telnet Client
Telnet is an ancient insecure communication protocol. Because of this, modern Linux systems may not include this package by default. You can easily install it using most common package managers.
DNF (Red Hat 8, CentOS 8, Fedora)
sudo dnf install telnetYUM (Red Hat 7, CentOS 7)
sudo yum install telnetAPT (Ubunut, Debian)
sudo apt-get install telnetNOTE: Be sure not to install the telnet-server package.
SSH Banner Grabbing with Telnet
SSH (Secure Shell) is the most popular method for remote administration of Linux systems. As you may know, SSH is an encrypted communication protocol. However, there is an exchange of clear text information before SSH creates the encrypted tunnel. This begins with a handshake.
TCP/IP connections begin with a three way handshake. Your client sends a SYN, the server responds with a SYN, ACK and then finally your client sends the ACK. After the handshake, some services will respond with information about what software and protocol it is using. This is known as it’s “banner”.

Now we will use our telnet client to capture information about the remote SSH server. Simply type telnet on the command line and you will drop to the telnet prompt. Telnet is now waiting for commands. Type open, followed by the IP address or hostname of the remote system, and the port number. In this case we are using SSH so we use port 22.
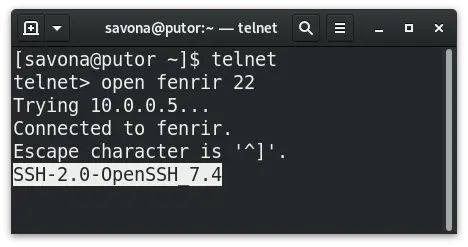
NOTE: You can also type the command as telnet <host> <port>.
Here we can see that the server is using SSH Protocol 2.0. We also discovered that it is running the OpenSSH server version 7.4. Now that we have this information, we can use the CVE database to look up it’s vulnerabilities. A malicious user can use this information to attack the service. Conversely, a system administrator can use this information to secure their services by patching the software against these vulnerabilities.
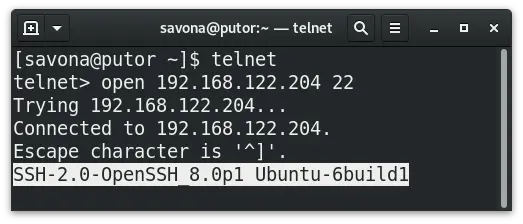
The information provided will differ from server to server. Below we see Ubuntu not only offers the protocol and software version in use, it also provides information on the operating system.
SMTP Banner Grabbing with Telnet
You can perform banner grabbing on other services as well. Above we demonstrated how to use it on the SSH service. Let’s try something different. On our Ubuntu development server we have a SMTP server configured. We can use the same technique to gather information about this service.

Our SMTP server uses TLS, so the port is 587 rather than the default 25. By using our banner grabbing technique we know the hostname, the service, and the operating system name.
Other Tools Used for Banner Grabbing
There are plenty of tools that can be used for banner grabbing. Let’s take a look at some of the more approachable and widely available utilities.
Using Nmap for Banner Grabbing
Nmap is another widely used tool for banner grabbing. It is not as easy to use as telnet, and it sometimes requires elevated privileges to use.
[savona@putor ~]$ nmap -Pn -sV 10.0.0.5 -p 22
Starting Nmap 7.80 ( https://nmap.org ) at 2020-03-02 21:51 EST
Nmap scan report for fenrir (10.0.0.5)
Host is up (0.00041s latency).

PORT   STATE SERVICE VERSION
22/tcp open  ssh     OpenSSH 7.4 (protocol 2.0)

Service detection performed. Please report any incorrect results at https://nmap.org/submit/ .
Nmap done: 1 IP address (1 host up) scanned in 0.32 seconds
The -Pn options tells Nmap to ignore discovery, and the -sV options asks for service and version information. These options are followed by the target IP address and -p to specify the port. In this case we used port 22 for SSH, but it can be used for other services.
Here is an example of banner grabbing with Nmap on a web server:
[savona@putor ~]$ nmap -Pn -sV 10.0.0.2 -p 80
Starting Nmap 7.80 ( https://nmap.org ) at 2020-03-02 21:54 EST
Nmap scan report for putor.aivila.net (10.0.0.2)
Host is up (0.00017s latency).

PORT   STATE SERVICE VERSION
80/tcp open  http    Apache httpd 2.4.41 ((Fedora))

Service detection performed. Please report any incorrect results at https://nmap.org/submit/ .
Nmap done: 1 IP address (1 host up) scanned in 6.34 seconds
Banner Grabbing with Netcat
Netcat (or nc / ncat) is a utility that can read and write data using both TCP and UDP. It is a very powerful troubleshooting tool, which in turn, makes it a powerful exploration tool.
Using a single option allows you to easily pull the software banner. Here invoke ncat with the -v (verbose) option to initiate the communication and grab the banner.
[savona@putor ~]$ nc -v 10.0.0.5 22
Ncat: Version 7.80 ( https://nmap.org/ncat )
Ncat: Connected to 10.0.0.5:22.
SSH-2.0-OpenSSH_7.4
Another example run against our web server:
[savona@putor ~]$ nc -v 10.0.0.2 80
Ncat: Version 7.80 ( https://nmap.org/ncat )
Ncat: Connected to 10.0.0.2:80.

HTTP/1.1 400 Bad Request
Date: Tue, 03 Mar 2020 03:08:34 GMT
Server: Apache/2.4.41 (Fedora)
Banner Grabbing with Wget
The wget utility is a command line designed for non-interactive download of files from the internet. Using the -q (quiet) option we can suppress the normal output. The -S option tells wget to print the headers sent by the server.
[savona@putor ~]$ wget 10.0.0.2 -q -S
  HTTP/1.1 200 OK
  Date: Tue, 03 Mar 2020 03:10:28 GMT
  Server: Apache/2.4.41 (Fedora)
...OUTPUT TRUNCATED...
Since wget was designed to fetch files from the internet it is restricted in use to certain protocols. You can use wget for web and FTP servers, but you cannot use it for other services like SSH and SMTP.
Conclusion
Banner grabbing is one of the easiest and most common recon techniques. There are many tools and scripts that allow you to get this information. We covered the basic Linux/UNIX utilities like the wget, nc and telnet. However, there are also specialized infosec utilities like Dmitry and ASR. Telnet is by far the easiest to use and almost always readily available.
Fascinating, I suppose I was always aware of this, but hadn’t realised how much can be gathered so quickly.
I know you can turn somethings off, for example there is an option in Apache to do that, I’ll have to check the other applications on my box to see if I can make them less verbose!